Showing posts with label Contesting. Show all posts

Sunday, February 23, 2025

The Challenge of a New QTH

A decade ago, my wife and I spent four years in Floyd County in one of her church postings. We loved the area, and imagined we'd retire there.

In November we took the first step. Bought a house in Floyd County near Rome, GA. House is on the top of a small mountain - Ward Mountain, rising 300 feet above the valley floor below. From the front porch, there is a gorgeous view to the West. On a clear day we can see 35 miles to Lavender Mountain, which is practically in Alabama,

The house is a little smaller than we'd like at 2100 square feet, but there's over 11 acres of land. A small office outbuilding with one room and a tiny bathroom has become the ham shack.

We've owned the house in Gwinnett county for 30 years. Now we are transferring things to the new house. There's a lot to do. We'll sell the Gwinnett house in the next months. In the meantime, I'm focused on building up the Floyd QTH when I have the energy.

Antennas are the first order of business. I first put up an 80/40/20m Trap Dipole. It's up about 12m in the trees. I erected a 160m Inverted-L with two elevated radials. It's a bit noisy, so receiving antennas are likely needed to make the most of that. I plan for three beverage antennas. A 6m dipole barely 4m up in the trees offers me an option on that band.

I've also put together the HF4B. I've mounted it on a 19 foot pole lashed to a deck post. It needs adjustment to work well. It's OK on 10m, but 15 and 20m aren't quite right.

I'm planning to put up a tower. I'll need to take down the tower in Gwinnett first. My plan is 70 feet of Rohn 25, with the A3S/A743 on top. 35 feet below that will be an A3S, pointed at Europe. This would give me a stack toward Europe, plus coverage in other directions with the top antenna. Horizon is unobstructed in every direction except to the NorthEast, where the two additional summits of the Ward Mountain chain are. Those peaks are just 100 feet and 140 feet higher, but they are 1 km and 2 km away, respectively.

I'm already seeing good results with the 80/40/20m trap dipole. There are benefits to being on the top of a mountain. Even a simple tower should be awesome.

For 6m, I'm on the lookout for a 5-6 element beam. The Cushcraft A50-3S i've been using in Gwinnett just doesn't have enough gain to work the intercontinental paths. 

On the office building, I've already moved in an operating desk with desktop shelves, and another luncheon table that serves as a workbench. The main part of the floor is a little more than nine feet square, And almost six feet of the rest of the building is split between the tiny bathroom and the rest of the floor. The desk and workbench are a bit of a squeeze.

A wire shelving rack takes up some of the space opposite the tiny bathroom, and gives me room to store things. I don't know how I'm going to get a whole basement of ham gear into this little building.

Such is the challenge of a new QTH.

Monday, September 30, 2024

Cycle 25 is Kicking Butt

Don't know why I didn't write about this when it happened.

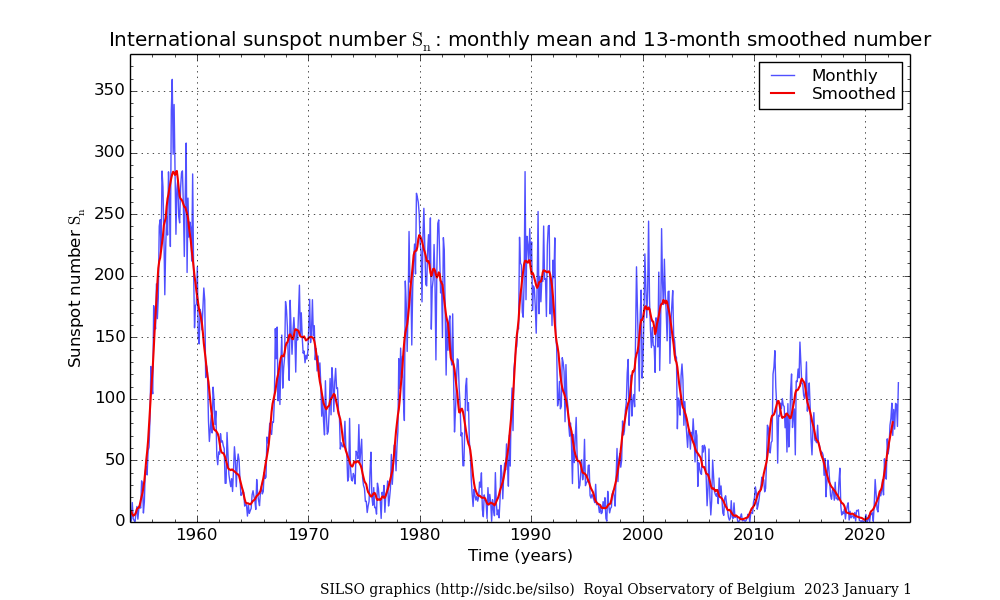
August 9th, the daily Sunspot Number (SSN) was 382. That seemed enormously high. I couldn't remember a single time when the SSN was that high. So, I did some digging.

I downloaded all the SSN data, converted into an Excel spreadsheet and did some analysis. The SSN hasn't been that high since 1991. That's 33 years ago!

The SSN has only been this high a total of ten times in my lifetime (since February 1961) -- Five in 1979, Twice in 1989, and Three times in 1991. 

Of course, none of this compares with Cycle 19, where daily SSN values were well over 500 for many days. But those values all happened 1956-1959, well before I was born.

Cycle 25 is shaping up to be much better than Cycle 24, which was really lousy, and possibly better than Cycle 23.  The smoothed SSN has already exceeded the maximum value for Cycle 24, and it is far from over. 

We've already seen a huge change in the bands in the last couple of years. 20m is open 24 hours, and 15m much of that time. 12 and 10m is open every day. I'm hoping we might see some 6m F2 openings. Enjoy it while you can. We should have two more years of these conditions before the cycle starts back down.

Wednesday, September 11, 2024

RTTY Contest Operation and Messages

In 1985, I built a home-brew decoder and experimented with RTTY, but I never got it to work. I've since decided that I didn't know how to tune RTTY properly. Things changed in 2005 when I downloaded CocoaModem made my first RTTY contacts. 

Since I was involved in contesting, I naturally turned to RTTY contesting. Today, it is unusual to hear RTTY signals on the bands except during contests. Thirty or more years ago, RTTY was commonly heard on 80 and 20m. 

Characteristics

Several characteristics of RTTY must be understood in order to communicate effectively: 
  • RTTY has no error correction or detection -- unlike AMTOR, Packet, FT4 or FT8. This means whatever that prints might be wrong. And if it is wrong, you will not know. 
  • RTTY prints garbage. Without a signal, random characters print. This further complicates determining what is correct and what is not. 
  • RTTY does not handle multiple signals well. When two or more stations call at the same time, RTTY will not print reliably. Certain decoders may print the strongest signal, if you are lucky.
  • RTTY text comes in a continuous stream. Long lines wrap to the next, or one can force a new line by sending a carriage return / line feed combination. Wrapped lines are often difficult to read.
  • RTTY has two shift states, LETTERS and FIGURES in the Baudot encoding. RTTY rests in the LETTERS state. An unprinted FIGURES character is transmitted to shift to the FIGURES state. A similar LETTERS unprinted character can be sent to shift back, or one can automatically unshift on a space character. 

Principles

For effective RTTY contest communication, several principles apply. 

  • Brevity - every character sent must have a purpose. There should be no wasted characters.
  • Duplication - every important element should be sent twice. This contradicts the brevity principle. Because RTTY prints incorrect characters, sending important elements twice helps ensure correct reception.
  • Scrolling - each message starts a new line, but ends with a space. This technique keeps lines from wrapping, and avoids the end of message being confused by garbage characters when the signal drops. 
  • Shifts - avoid needless shifts. Any sequence involving the unprinted FIGURES or LETTERS characters takes longer to send. 

Messages

(I'm using N1MM messages for my examples. Other software may have different macro names and techniques, but the same principles apply)

Every message starts with a {TX} and ends with {RX}. This transitions the software to transmit and back to receive. 

S & P

Let's say you want to answer someone's CQ. This means you need to send your call. For that, you'd use a macro like this:

{TX}{ENTERLF}{MYCALL} {MYCALL} {RX}

or

{TX}{ENTERLF}* * {RX}

(For N1MM, the asterisk and {MYCALL} macros are the same)

Notice the message starts with {TX}, performs a carriage return / line feed with {ENTERLF}, sends the call twice, ends with a space and then {RX} to go back to receive. Sending the call twice helps to ensure the recipient receives it correctly.

If you are lucky enough to get a response, you'll have to send the exchange. The exchange will vary by contest, but it could be a message like this:

{TX}{ENTERLF}! 599 GA GA DE {MYCALL} {RX}

This is what I send in the RTTY Roundup. First is the recipient's call (!). Then 599 -- don't use 5NN, because that actually takes longer to send in RTTY -- and send it only once, because it isn't important. Then the exchange is sent twice, followed by the prosign DE and my call, followed by a space. 

N1MM's authors recommend you use the ! character rather than the {CALL} macro. The reason is that {CALL} isn't subject to correction -- it sends the contents of the Call field at the start of the message. The ! character will send the Call field as it is being corrected in real time. As a practical matter, most RTTY contest contacts involve pointing and clicking on callsigns, so there's less typing, and therefore fewer corrections involved.

A couple of things here. Notice I did not use the {EXCH} macro above. When there are multiple elements to the exchange, I put the repetitions together. So, I tend put the exchange information into the macro directly. For example, here's an S & P exchange for CQWW RTTY:

{TX}{ENTERLF}! 599 GA GA 5 5 DE {MYCALL} {RX}

GA for Georgia, and 5 for zone 5. For NAQP RTTY, it would be:

{TX}{ENTERLF}! 599 BILL BILL GA GA DE {MYCALL} {RX}

Some might balk at the use of the DE prosign, particularly for exchanges that involve a state or section, since DE might be confused with Delaware. However, I think this prosign is useful, as it establishes the callsign is of the answering station, and not the CQing station.

CQing

Calling CQ in a contest is the most-used message:

{TX}{ENTERLF}CQ RU {MYCALL} {MYCALL} CQ {RX}

Note that the important information -- the callsign -- is repeated. The other curious thing is the "CQ" at the end. This indicates I finished a CQ message. This is important because one cannot tell when potential callers tune in to your signal. If they do so during the first callsign, the can't tell if you are calling or answering a CQ. Putting "CQ" at the end establishes you are calling CQ. And it is shorter than "QRZ?".

Naturally, one indicates the contest in the CQ message. Here it is "RU" for Round Up. Use whatever is appropriate for the contest, or simply "TEST".

When someone answers your call, you send an exchange message:

{TX}{ENTERLF}! 599 GA GA ! {RX}

Note that the exchange is sent twice, and if there were more than one element to the exchange, I'd send those twice as well:

{TX}{ENTERLF}! 599 BILL BILL GA GA ! {RX}

Another item to notice is there is no {MYCALL} macro in this message. Instead, the caller's callsign (!) is sent twice, once at the beginning and once at the end. There are two reasons for this. First, it follows the principle of sending important information twice. It could be the caller's callsign printed incorrectly to me, or perhaps it will print incorrectly when I send the message back. If I only send the callsign once, the caller might or might not correct it if is wrong, or they may correct it if it printed incorrectly to them. 

Unnecessary corrections are a waste of time, but necessary corrections are desired. 

Second, it may be that during the response with the exchange, other stations may also be calling. This, creates a good chance that the initial callsign in the response will print incorrectly. If you don't send the callsign again at the end, it could be unclear who you responded to. 

Once you've received the exchange from the caller, one sends an acknowledgement:

{TX}{ENTERLF}! TU DE {MYCALL} CQ {RX}

Short and simple. Two features here. One is the DE prosign, to indicate this is the transmitting station's call, and ending with "CQ" to invite new callers.

Turnaround

Occasionally, multiple callsigns will print in response to a CQ. You can only respond to one at time.  Since you can only respond to one at a time, this leaves someone waiting. Rather than have them call again, you can use a turnaround message which acknowledges a completed contact and starts a new one:

{TX}{ENTERLF}! TU {LOGTHENGRAB}NOW..{ENTERLF}{F5} 599 GA GA {F5} {RX}

This message omits {MYCALL}, and uses the {LOGTHENGRAB} macro to first log, then grab the callsign off the automatic decode stack, then it follows with the normal exchange. If you use Single Operator Call Stacking, you can use {LOGTHENPOP} instead. See the N1MM manual.

Note that instead of using the exclamation point (!), we use the {F5} macro. Both the exclamation point and the {CALL} macro won't be updated by the {LOGTHENGRAB} macro, but {F5} will.

Short

When signals are strong, and the bands are quiet, perhaps the principle of sending information twice doesn't apply. Most RTTY contests allows contacts on multiple bands, and the exchange doesn't change. In these cases, you may want to have short messages handy. Here are some examples:

{TX}{ENTERLF}! 599 BILL GA DE {MYCALL} {RX} -- short S & P exchange

{TX}{ENTERLF}! 599 BILL GA {RX} -- short exchange for S & P or CQing

{TX}{ENTERLF}599 BILL BILL GA GA {RX} -- repeat of just the exchange 

{TX}{ENTERLF}CQ RU {MYCALL} CQ {RX} -- short CQ

{TX}{ENTERLF}TU DE {MYCALL} CQ {RX} -- short acknowledgement

All these should be used when you have solid copy, want to get back to other callers quickly, or you are fairly certain the other operator already has your exchange information from a previous contact.

Tips

Some tips I've picked up over the last decade that are helpful.
  • Use Slow AGC - Fast AGC can confuse decoders and introduce print errors
  • Use TX Filtering on AFSK - If you are using MMTTY or similar software, use the 512 tap TX Filter. It helps transmit a cleaner signal.
  • Listen with Headphones - sometimes you can hear signals that don't always print, if you listen with headphones, you can hear the stations calling you. It also helps you improve your timing in a pile.
On that last tip, turn the volume on the headphones way down. You just have to sense when signals are there, you aren't decoding them. (I believe it was the late Irv Hoff, W6FFC (SK) -- a RTTY pioneer -- who suffered hearing loss at 2125 and 2295 Hz from listening to RTTY signals)

Practical Messages 

There are a handful of other messages you may wish to have handy. Here's one I use often, when you didn't copy anything sent:

{TX}{ENTERLF}AGN AGN {RX}

Or perhaps you need a fill of one element:

{TX}{ENTERLF}STATE? STATE? {RX}

{TX}{ENTERLF}NR? NR? {RX}

{TX}{ENTERLF}NAME? NAME? {RX} 

 Before you open up with a CQ on a frequency,  this is good one:

{TX}{ENTERLF}QRL? DE {MYCALL} {RX}

 Maybe if you are not sure someone is calling you:

{TX}{ENTERLF}QRZ DE {MYCALL} {MYCALL} {RX}

Or the short version:

{TX}{ENTERLF}QRZ DE {MYCALL} {RX}

Every once and a while, directed call is useful, especially when two stations are calling CQ on top of each other:

{TX}{ENTERLF}! DE {MYCALL} {MYCALL} {RX} 

Conclusion

RTTY contests are a ton of fun. Program a set of messages and try it. You'll like it.

Monday, February 6, 2023

Nine-Band Worked All States

Nearly twelve years ago, I wrote about completing Worked All States on six bands. I'd worked all states on 160, 80, 40, 20, 15 and 10m. About three years ago, I finished up 30m, so now it was seven bands. However, finishing 17 and 12m seemed like it would take forever. I felt stalled out.

A couple of months ago, it occurred to me that I was only four band-states away from Ten-Band Worked All States. I needed Delaware on 17m, Kentucky on 12m, and Alaska and Hawaii on 6m. 

The 6m states would have to wait -- I'd need very special conditions to work either state. But with the recent rise in sunspots, working those close-in states on 17 and 12m seemed do-able. The biggest problem would be operating the Gwinnett station. That was solved after I configured the RemoteRig devices to allow remote operation. 

Indeed, the first afternoon operating remotely, I was able to work Kentucky on 12m and the LoTW confirmation came the next day. Finishing off 17m took a month longer.

It was surprising to me how calling CQ DEL AA4LR EM83 would gather so many responses from people who were not in Delaware. I worked at least one station in Delaware, but the LoTW confirmation was not forthcoming. Then the RemoteRig Control device no longer powered up.

I got lucky one Friday afternoon when I was in Gwinnett county and managed to get a legitimate answer to my CQ DEL message and a confirmation later that day. I'd done it. Worked All States on Nine Bands. 

Now, I just have to wait for those special conditions in order to work Alaska and Hawaii on 6m....

Monday, January 30, 2023

Remote Operation - Level 1 (RemoteRig RRC-1258MkII)

RemoteRig RRC-1258MkII at Radio

Last spring, I wrote about using RealVNC to remote control a computer in my shack allowing me to make FT8 contacts on 6m. I have made many contacts using that remote system, including several new countries and grids.

I want to be able to operate the Gwinnett county station remotely -- on any mode or band, as if I were sitting there. Doing this required several connections over the internet, and, being behind on other software projects, it seemed a daunting one. 

A company called Microbit (www.remoterig.com) has a solution. The RRC-1258MkII is a pair of devices that establish multiple audio, serial and control links over the internet. One unit sits with the Radio, the other is called the Control. They are similar boxes, with subtle differences: the Control box as a CW speed knob, but the Radio box does not. These units work with a number of radios, including the Elecraft K3. 

One operating mode is K3 Twin. In this mode, the Control K3 acts as a front-end to the remote Radio K3. All the knobs and buttons operate the remote radio. Indeed, Elecraft made special, stripped down, non-RF versions of the K3 for this purpose (K3/0, later the K3/0-mini).

This seemed perfect, as I owned two K3 radios. Obtaining the RRC-1258MkII was more difficult. Microbit is based in Sweden. Due to the pandemic and subsequent supply chain issues, they no longer sold them in the USA. I had to find them used. 

I managed to find Kirby, VE6IV, who had a set surplus to his needs, and we agreed on a price. Then ensued a much longer negotiation on how to get the funds to Kirby in Canada. Eventually, we figured it out, and a week later, the devices were delivered.

Configuration

Configuration was not plug-and-play, by any means. These boxes are designed to connect to 10/100BaseT networks. I found an old router and set up a local network to do the initial configuration. First step was to update the firmware. This did not work over the network, and I had to use the USB connection. After a few tries, I successfully updated both units to the latest firmware. 

The local web server in each box allows configuration of the other parameters. There are dozens of settings, and the manual leaves a bit to be desired explaining all the details. 

First order of business was the IP configuration. I opted to define a static IP addresses on my local network. 192.168.1.64 for the Radio, 192.168.1.65 for the Control. You can use DHCP for the Control, but it is easier to change configuration settings when you know the address. 

The Radio device needs to be accessible from the public internet. Since I don't have a static public IP address, I opted to use dynamic DNS. RemoteRig supplies such a service, at ddns.remoterig.com. They automatically set up a host address based on your serial number. 

I set the web site username and password, as well as the SIP password. Audio was set for 16 bits and 8 kHz dual channel. The COM ports were set with COM1 inactive, COM2 in logical parallel with COM0, and COM3 inactive. 

Setup

Next step was to integrate the Radio unit into the Gwinnett station. I still needed to use the station locally. I found that I could connect the local computer through the COM1 port on the Radio unit and still be able to run WSJT-X locally. One caveat - the RemoteRig devices don't pass through the DTR and RTS signals, so you can't do CW keying from the serial port. You also can't update K3 firmware. Both of these require direct connection of the computer to the rig.

The manual shows the Radio unit connected with seven different cables, but only six of them are described in the manual. The seventh cable connects from the I/O port on the back of RemoteRig to the ACC jack on the K3. The Radio unit turns the K3 off when you disconnect remotely. Without this seventh cable, you cannot turn the K3 on when you connect. That took some experimentation to figure out.

Initial Connection

Puzzling out the rest of the operation was easier on the local network. I programmed my Control unit to connect directly to the Radio unit's local IP address. Initially, I couldn't get anything to work. I would have brief periods where the Control unit would connect. I could hear the audio of the radio, and then it would disconnect. Nothing was happening with the Control K3.

Part of the problem is my Control K3 had been upgraded to a KIO3B, so it did not have an RS-232 jack. Generally, I used the USB port. The KIO3B has an RJ-45 jack labelled RS-232/P3, and I had a cable designed to plug into the P3. I used that cable, but it didn't work. I decided I needed a special cable from Elecraft, part #E980297, an RJ-45 to DE-9S. 

The new cable didn't work either, and that lead to more sleuthing. I tried using the K3 Utility on this cable, and it didn't work either. I then discovered that the CONFIG:RS-232 menu had to be set to 38400 b for the serial connection to work. That was part of the problem.

A bit more checking and I determined that the RemoteRig COM2 jack required a null modem cable between it and the K3. I had that, and it required a male/male DB-9 adapter. Both these items were in the batch of cables that Kirby shipped me. 

With CONFIG:RS-232 and the correct cabling, the Control unit placed the Control K3 into TERM mode. I successfully connected locally. 

Remote Connection

Connecting through the dynamic DNS address was the next step. I figured I had to change the SIP Contact parameter on the Control unit. That was correct, but it would not connect. Then I thought perhaps it didn't work because I was trying to connect on the same IP address on the public network. So, I packed up the K3 and the Control unit and took them back to Warren county. But, it didn't work there, either.

This was frustrating. Then it occurred to me that perhaps I had to re-program the firewall of my Gwinnett county router to let certain traffic pass. I lamented that those experiments would have to wait until I could pack it all up and go back to Gwinnett county to fix. Then it dawned on me that I could use the RealVNC connection to my shack computer to re-program the firewall remotely.

Programming the router was not simple. I used the IP Allocation mode of Default Server to direct all incoming traffic to the Radio unit IP address. That worked! I was able to connect and control the station.

This configuration worried me. RemoteRig uses four UDP ports, plus TCP port 80 for the web server configuration and port 23 for telnet configuration. Having those TCP ports open on the public internet seemed like a bad idea. A single password protected access, which seemed to invite hacking.

Instead, I wanted to pass the traffic on the four UDP ports and block everything else. This was accomplished by setting up four custom "gaming" services for each UDP port. I then assigned these services to the RemoteRig Radio IP address. Bingo.

Operation

Operation is pretty straightforward, even though the RemoteRig manual isn't. To activate the system, you simply turn the Control K3 on. Within 20-30 seconds, the devices connect across the Internet, the remote K3 is turned on and the Control K3 goes into TERM mode, and audio starts streaming into the Control unit. All of the knobs, buttons and indicators on the Control K3 operate the remote K3. 

When you are finished, you turn the Control K3 off, and the remote K3 also turns off. If you happen to lose your internet connection, the remote K3 turns off in about a minute. 

During my experiments, I was able to confirm operation of WSJT-X using the remote shack computer. I've also been able to transmit CW, using the paddle check on the Control unit. So far, though, I haven't figured out how to transmit voice signals. Most likely, I have another cable or configuration problem. 

Limitations

The system has a few rough spots. The audio volume is controlled from the Control K3 volume control. Certain operations stop the audio stream -- switching into or out of SUB receiver mode, or into or out of DIVersity reception. Moving the volume control brings the audio stream back. 

In my set up, the audio occasionally has small drop-outs, perhaps when a UDP packet fails to arrive in time. For this reason, I would not recommend using RTTY across the audio connection. One can operate a remote computer to run RTTY, just as I do for FT8. There may be a configuration option to help this.

Next Steps

While I can operate my Gwinnett K3 remotely now, I need to automate other parts of the station. I cannot change antennas, rotate rotators or switch the K9AY direction. I'm working on solving those problems.


Update: Sad News

Unfortunately, about two weeks after I started writing this article, my Control unit fails to power up. I apply power, but the PWR LED does not come on. I've tried with two different power supplies, no luck. RemoteRig support indicates this could be a failure of the CPU. Sadly, they don't offer repairs in the USA, and will have no replacement units available until May, 2023. 

In the meantime, I'm back to Remote Operation - Level 0.

Sunday, January 16, 2022

The Desktop Shelves

Updated shelves as of January 2022. The AL-80A
Amplifier is just off to the right side, on the desk.
Setting up my shack in my first home, in 1986, I needed to stack equipment. My operating position was a finished door on top of two filing cabinets, something that I used in my previous apartment. While the table was big enough, shelves were needed to easily access all my equipment. 

I came up with a design using 1x12 lumber. There are three shelves, one 1", 12" and 22" above the tabletop. I chose these heights because it allowed me to slip my paper log books and other operating aids under the bottom shelf -- under the bottom row of gear. 

I bought a stack of 1x12 boards, borrowed a friend's table saw and cut the pieces to length. I laid them on edge on the cement floor of my garage, glued the edges and pieced them together with wire brads. Everything lined up OK -- the result was pretty square.

35+ year old shelving unit, before
it was removed from desk
The shelves were 48" wide ( 8 foot boards cut in half ), and had two uprights under each shelf. These shelves worked for several decades.

Over time, I noted problems. The upright supports limited the equipment I could put side by side, because only so much would fit. And the lowest shelf was problematic -- it meant my computer was in front of the shelf -- which meant my arms hung off the desk, with my forearms resting against the edge of the desk. This caused a lot of fatigue when contesting. Plus, I had stopped using paper logs back in 2006, so there was no reason for the lower shelf.

Micro-shack, before I moved.
I liked the layout I had back in the micro-shack. The desk surface was small (just a couple of inches wider than 5 feet), and the primary equipment sat on the desk itself, with other gear on a shelf. This meant I could re-position my gear at will. Best of all, the computer could be front and center, with my forearms resting comfortably on the desk itself. 

After 35 years, the requirements came together. I needed a shelf unit with two shelves. The first shelf would be 12" above the desk, and the second shelf 22" above the desk. This left more than enough room to slide a 15-17" laptop under the bottom shelf. The shelves could be a little wider, to accommodate more equipment. Because my copper pipe grounding bar was a little more than 53" long, I opted to make the unit 52" wide. 

I liked having the AL-80A amplifier on the right side of the desk, canted slightly to make the controls accessible, and allow for good cooling airflow. With a 52" wide self unit, this meant about 8" of unused desk space on the left-hand side. That was fine. That part of the desk is right next to a wall, and I don't put equipment that deep -- usually that's where my headphones and operating aides end up.

The bottom and top shelves would be separated by two uprights, with openings of roughly 17" on the left and right, and 15" in the middle. Under the bottom shelf, there would be no uprights. Instead, to keep the shelves from bowing, I used a piece of 1x4 as a sheer web at the back of the unit. 

Here are the component dimensions used:

  •   top (1x12) - 52” 
  •   shelf (1x12)  - 50 1/2” 
  •   ends (1x12) - 21 3/4” (2) 
  •   separator (1x12) - 10” (2) 
  •   shear web (1x4)  50 1/2” 
I bought the requisite 1x12 and 1x4 lumber, but didn't cut or assemble until later. This was unfortunate, because the lumber cupped a little bit as it dried out in my basement. This made the pieces a little harder to fit together. I used the same construction technique I used before -- glue and wire brads. 

And even though I put the pieces together on my very flat workbench, a little bit of twist was introduced in the bottom shelf. It doesn't quite line up in the front like it should -- something I'll be looking at for the next 30+ years. I considered busting it apart and starting over, but I decided it would do as is. 

Assembled unit with
grounding bar installed
I intended to stain it and seal with polyurethane. However, I found that my stain had turned into a solid mass of jelly and was unusable. Instead, I applied three coats of polyurethane. The resulting finish is quite handsome.

The shelf unit is relatively light and quite sturdy. I'm sure it would support my weight, but I didn't try. The copper pipe grounding bar fastens to the 1x4. I use small hose clamps to attach wires to the grounding bar. This ensures that all gear is properly bonded to ground.

I'm very satisfied with the end result - plenty of room for gear on the desktop, with other gear on shelves at a handy height. The bits and pieces of equipment are slowly coming back to the operating desk, and I'm being careful in deciding what goes where -- it can get awfully cluttered. 

I do love having a lot of space for computer gear on the desktop. I've had as many as three different laptops all running at the same time on the desk.

Now I've got to finalize where everything goes. I've already decided I need to move the P3, and the KK1L antenna switch matrix is going to end up on the basement wall on the Single-Point Ground panel.


Friday, November 27, 2020

Improving the Shack Desk

Finished, standing against wall.
Thirty-five years ago, I asked my father-in-law to be for advice on lumber for an operating desk. He suggested I find a solid core door. I bought an 80x30" door and have used as my operating desk since. It has held up very well, surviving two moves, and three re-finishings. 

Originally, I bought the door and two small two-drawer filing cabinets. With the cabinets on either side of the door, the result was a very stable platform, strong enough for me to stand on. 

However, it wasn't the most perfect arrangement, as I wrote four years ago. Adding a 1/4" radius edge to the front, was a  dramatic improvement, mainly because the operating surface was just too tall. 

This year during Contest University,  Doug Grant K1DG gave a talk on Optimizing Your Station For Contest Operations. One of the salient points in his talk was that the operating desk needed to be at the right height for the operator. 

The door across the filing cabinets was 30 7/8" off the floor. Doug's talk indicates that the optimum for my height should be closer to 28 1/2". The micro-shack desk was about 30", and the luncheon table that serves as my workbench on the other side of the shack is 29" off the floor. What I needed were shorter supports. 

Box frame.
It is not possible to make the filing cabinets shorter, so I needed something else. It had to be strong -- the door itself is heavy, and the linear amplifier and other bits of equipment add up. I also needed to be able to get it through the door to my 6x15 foot room that is the shack. 

What I came up with is a set of box frames aligned by some cross members. The box frame is a "U" shape made out of 2x4s, capped with a 30" 1x4. A couple of 1x4s act as a shear web to keep the box frame square. It's held together with glue and screws. Three 58" 1x4s serve as the cross members. The cross members are each in a different plane, and give plenty of room for a chair to roll underneath.

Finished stand.
It's sufficiently strong that I can easily sit or stand on it.

And, here's the best part. It's on six castors, so I can move it away from the wall to get behind the desk to wire things. No more having to do my rig wiring blind!

I was worried that the tile floor might make it hard to roll the desk, but it's actually pretty easy. 

This design is pretty simple, and it came together quickly. The 30" 1x4s on top have a single wood screw on each end into the door, so the surface can't slide around. And the cross members are held on only with screws, so they can be removed when in order to get the whole assembly out of the shack.

Voila! Away from wall.
The door already has a couple of power strips mounted on the underside, which makes plugging in equipment that much easier. 

Based on what I was thinking four years ago, the next improvement will be the equipment hutch that goes on the desk. That's also a relic from 30+ years ago. I've already purchased the lumber for that project....


Friday, January 10, 2020

Ingenious Fan Holder for K2/100

Binder clip. I should have thought of this earlier!
The K2/100 is a nice little radio, but when running RTTY or other full-duty cycle modes, it lacks sufficient cooling. I couldn't run more than about 30-35 watts without the KPA100 amplifier heat sink becoming alarmingly hot.

I solved this problem a years ago with a small muffin fan on top of the heat sink. The fan is mounted on tiny rubber feet. It blows air upward, resulting in airflow across the fins. Placed just above the finals, it does a good job of keeping everything cool.

This fan is noisy at full speed, so I used a small resistor in series. The resulting half speed airflow is more than sufficient.

This worked great at my Gwinnett QTH for years, where the radio was raised above the desk a couple of inches by a shelf. The K2/100 sat almost flat, and the fan stayed in place. However, when I moved the K2/100 to the parsonage QTH, the radio rested on the desk, and I used the KAT100 tilt bail. Because of the tilt, the fan had a tendency to drift to the back. Every once in a while, it would fall off.

While I was readying the K2/100 for the 2020 ARRL RTTY Roundup, I wanted to make sure the fan stayed put. I came up with a very inexpensive solution. A small binder clip attaches easily to the heat sink fins. The ears of the clip rest against the fan body and prevent it from drifting.

Worked about eight hours over two days in the RTTY Roundup, and the fan never budged. I really wish I had thought of it sooner!


Friday, September 21, 2018

What's Next for DXCC?

At the end of summer every year, I start thinking about DXCC. For several years, it was getting more confirmations for 80m DXCC, so I could complete 5BDXCC. Last year, I accomplished that, including the 30m endorsement.

At the time of this writing, I have 109 confirmations for 17m. That band will be next - I'll submit that this year. This will also push me over the 1000 confirmations threshold for DXCC Challenge - I'll do that one at the same time.

The downside of earning DXCC awards on each band is there are fewer bands left.  On 12m, I need just 17 more confirmation. Given the low level of sunspot activity, that might take some doing. However, I did manage to add 10 confirmations since last year, so it is possible.

160m would be the next one. With 46/45 confirmations, it's further off. I'm not even half way to the necessary 100. I will definitely put some work into 160m this winter. But, honestly, DXCC on 160m may take a few years.

Speaking of years, on 6m I have a whopping seven confirmations. In the spring, I figured out how to use FT8 on this band, and while I heard a ton of DX, I only managed to work a handful. Definitely looking forward to the winter sporadic-E season. I think the most excitement I'll get for a while is finishing off 10-band confirmations. I have USA, Canada, Mexico, and Suriname on all 10 bands -- but there's several countries where I just need a 6m contact.

I've inched closer to Honor Roll, with 279/276 confirmed Mixed. have worked about nine of the remaining 64, but I need confirmations. Perhaps it is time to learn more about QSLing effectively.

And, if nothing else, it's fun building endorsements for the bands I already have. That's the fun of DXing -- it's long-term fun.


Monday, May 28, 2018

WinKeyer 3 Serial

The finished product.
What's the use of having an excellent soldering station like the Hakko FK-888D if you don't have something to build?

I recently splurged about $40 and bought a WinKeyer 3 Serial. This is a very nice little board that has a WinKeyer 3 chip powered solely by the RS-232 signals on the serial port. I figured this would end all the timing problems I have with keying the rig from a serial port RTS line.

I would have preferred to buy the similar WinKeyer USB Lite, but unfortunately, that product has been discontinued. I suspect it may be because the Lite cut into the sales of the more expensive WKUSB-SMT.

The WK3 Serial Kit.
The kit arrived in a little plastic pouch. There's no manual, but there's a little slip of paper with a URL to download a manual. Not a problem. I just parked one of my computers on the workbench to read the instructions.

Assembly went quickly. I actually ended up following the steps out of order. I guess I should pay better attention, as the first part I assembled was the IC socket. I skipped assembling the resistors and diodes. Oops.

I quickly realized my error and went back and assembled all those parts. This is not a Heathkit. It's more like "insert all the resistors, solder, insert all the diodes, solder, insert all the capacitors, solder" type of kit.

Flip side of the kit. Not
many parts in this one.
For me, this was a piece of cake. Given how simple this kit is, it wouldn't be hard for a much less experienced kit builder. I elected not use use the speed potentiometer at the moment.

Once assembled, testing is a matter of hooking it up to a Windows machine and using a test application.

K1EL provides two programs: WKtest and WK3demo. The WK3 Serial Kit manual has a link to WKtest, although this appears to be an older application. WK3demo is the preferred application to use, at least according to the web site. I tried both, and they both worked.

This kit fired up and worked right after assembly, so no troubleshooting was necessary. I could easily program CW text to flash the on-board LED. Perhaps the hardest issue I had was figuring out exactly which USB Serial device I had hooked it up to.

Now that it's assembled and tested, I'll need to find a suitable box to mount it in, and wire up connectors to hook it to the rig. I didn't manage to complete this before the WPX CW contest, so perhaps next time.

Friday, September 22, 2017

Life after 5BDXCC

For the last several years, I've started off the late summer thinking about my plans to complete 5BDXCC. This has meant figuring how who to make more DX contacts on 80m, whether that meant improving antennas or just being on the air more.

But, this June, I managed to wrangle enough confirmations to qualify. I'll likely submit these in November.

As that time of the season rolls around again, I have to think - what's next? What comes after 5BDXCC? It's a good question.

I still have a few other bands to add. On 17m, I have 87/87 confirmations, so that's likely next. It will be easier now that I've identified the problem with my WARC dipole. ON 12m, I have 73/73 confirmations is not that far behind, although old Sol is not likely to be active enough to sustain much propagation on that band for a few years.

160m seems less likely, where I have 42/41 confirmations. Given how hard 80m was, it may take quite a while to add many more entities there.

The DXCC challenge is still unclaimed. I have 835 current credits, and my unapplied LoTW confirmations will bring me up to 1125, if I applied them all. Plus at least five more QSLs I'll submit this year could get me all the way to 1130. I've decided a couple of years ago not to push for this too early. The 80m DXCC submission this year, plus all the band endorsements should get me over 950 credits. I'll make it over the 1000 credit requirement as soon as I complete another band.

And, of course, there's the DXCC Honor Roll. At the moment, I have 259 current confirmations, which puts be 80 away from the 339 total. And 71 away from the 330 required to make Honor Roll.  That may take quiet a while. I have two cards that I'll submit this year, and there's a dozen more entities I've worked that I need to obtain confirmations from.

Naturally, some of these remaining entities are increasingly rare. The good news is there are several exciting DXpeditions this year. I'll have to make plans to work them when I can.

So, yeah, still a lot of challenges left in DXCC.

Friday, June 16, 2017

5BDXCC - YES!

For the last four low-band seasons, I've been hoping I'd capture enough confirmations for 5BDXCC. I had already confirmed 40, 20, 15 and 10m DXCC, I just needed to get to the magic 100 entities on 80m. As I wrote in the fall, I just needed a few more to put me over the top.

At that time, I had 91/90 confirmed on LoTW, plus a couple of cards.

Today, I received a confirmation on 80m from CE2VMF, bringing my totals to 98/97 on LoTW. Plus, I have THREE cards with additional confirmations, which brings the overall total to 101/100.

I remember talking to Jim Streible K4DLI (who now, unfortunately, is a silent key) about his 5BDXCC plaque. Jim said he had spent 35 years earning that award. And Jim earned it back in the day before electronic confirmations, too.

So, when I apply for DXCC awards later this year, I'll be petitioning for 6BDXCC (got 30m, too!).

I'll have to seriously consider ordering the plaque.

Friday, March 31, 2017

Radio 2017 - Progress March

I don't want to admit it, but no, not a lot of progress on this. No long vacation excuses this time, just busy with life. What can I say?

I did get to review the WWDC videos regarding storyboards. I (re-)discovered a few interesting things:
  • Set the main storyboard in the info.plist - I had done this.
  • You can build up window content by using content segues to multiple view controllers. I didn't have a need for this yet, but I'm sure it's coming.
  • Control-Drag directly from a menu or button to a window content view. This will produce a segue to the view controller. Easy and useful. The host view controller receives a method call prepareForSegue:sender: before the window appears for the segue. I'm not using this because there doesn't seem to be a way to associate the document window for this action when it appears on the application menu. 
So, my main question became -- how does all the other document stuff work? When you select File / Save, how does that get to the NSPersistentDocument class? Turns out, it uses a basic target/action to the First Responder. 

I just had to figure out is how to add my action method for my modes window to the First Responder. That turns out to be easy. Select the First Responder icon of the main menu. Then, use the Attributes inspector, and you'll see a list of User-Defined actions. The weird thing is, though, once you've defined them, they disappear from this list.
No matter, just add an action, then edit it to be the method name you want. Then wire it up to the menu with control-drag as before. Implement the method anywhere in the responder chain. I implemented this in my document class. And my mode window comes up correctly, and I have a unique instance of it for each document. Cool.

Next is the hard part -- trying to figure out how to associate the managed object context of the document with the modes view controller. This is were it gets weird. The window controller has a property document which points to the document for that window. How you get to that value from the view controller is something I have not figured out yet. 

Tuesday, March 28, 2017

Cycle 25

Smoothed SSN of the last six sunspot cycles.
Cycle 24 sucked.

I mean, really. Look at this graph. It's pretty clear that Cycle 24 was barely half as tall as the three cycles before it. It wasn't even as good as Cycle 20.

Smoothed SSN in Cycle 24 never made it over 82. The previous four cycles had several years over 100.

And that was after a sunspot low that lasted a couple of extra years before Cycle 24 began an upswing.

Now we're in that downward slide again. I know from experience that we're not seeing the end of the lull between cycles until the 2800 MHz solar flux gets down to 66 or 65. That's probably three years away. And then it will take a couple of years to build up. I'm thinking it will be about 2022 before Cycle 25 shows it's colors.

In the meantime, propagation on 160m and 80m should be pretty good in the winter months for the next several years.

I've told my wife, I want to be ready for Cycle 25. I want to have my antennas and station ready to rock when the sunspots come back.


Tuesday, February 28, 2017

Radio 2017 - Progress February

Well, I can't say that I've made much of any progress since the last posting. I took a 10-day trip to Israel to visit Bethlehem, Masada, Galilee, Jericho, Jerusalem -- all the holy sites. The trip was very intensive, and after I returned home it took me about a week to recover and then catch up on all my missed work.

I did spend a little time going over my test programs trying to figure out the right way to write Cocoa code for MacOS X document-based apps with Storyboards. What I'm doing seems too complicated.

So, I've decided I need to go back and find the WWDC videos regarding using storyboards with MacOS X, and it also might be useful to view the the ones for iOS docment-based apps as well, to see if that gives me any insight.

With any luck, I'll make much more progress in March.

The Station Notebook

When I originally set up my station as a novice, I didn't make a lot of notes. I wrote a few things on the back-side of my logbook pages: radios I used, antennas I put up. But, for the most part, I freely made changes to my setup without a lot of documentation.

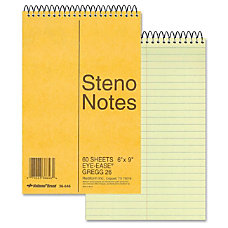
Some years later, I had a small steno-style notebook lying around, and I used it to record certain information. Like the exact color-code of the RS-232 cables I wired up for my computer. That sort of thing was handy to have written down, because it saved a lot of reverse-engineering later I went to make another cable. But that was about it.

Perhaps a dozen years ago, I read a couple of articles about James Lawson, W2PV, and how he kept copious notebooks about his station. He even solved a sticky problem during a contest, because he kept notes about his antenna installation.

After that, I started writing more things down in my little Steno notebook. Most of it was changes I made to the station -- radios or antenna modifications. Or if something big happened -- like I blew up the amplifier. I recorded a lot more details, and I put dates on everything.

But when I began to spend most of my time out in Floyd County it put my little steno notebook out of reach. I had a new station and I still wanted to keep notes. My solution was dead simple -- I created a text document using TextEdit. I called it Floyd County Station Log.

Looking at it today, it's more like a diary. Each month, I put in a new heading: March 2017. And below that I record anything interesting that I do. I record the things that work, and I also record the things that don't work! If I don't do anything that month, I'll just change the heading to the next month.

The bottom of this document has a list of projects to be worked on. Silly now, since I'm no longer at that QTH: 6m antenna, K9AY controller, 20m and 30m traps for the dipole, tribander-Moxon  times 3 (now that's an interesting project I'll need to write about some day!), remote antenna switch, etc.

This method worked so well, in May 2015, I adopted it for my main station log. Not only did I make new entries, but I also entered all the data from the steno notebook. Plus, I went back through all of my contest comment submissions and recorded all the changes I had made to the station from November 1994 to date.

Today the Gwinnett County Station Log is a reasonably complete record of all the things I've done with the station for the last 22+ years. It has six pages of project notes at the end. Lots of stuff to work on! And, yes, I also have a smaller document for the Walton County Station Log.

I guess my point is that having a station notebook is extremely valuable. It doesn't matter if you use a small steno notebook, a spiral-bound notebook, a composition book with graph paper, a loose-leaf notebook, or a computer document. The important thing is to find a style that works for you to keep notes. After a while, there's just too much to try to remember. So keep good notes.


Tuesday, January 31, 2017

Radio 2017 - Progress January

Quick progress report on the Radio 2017 project. I've managed to get started on the casual logging program. I've created the basic framework and a local Git repository. An early cut of the Core Data model is in place. You can't do much more than run the program and create, save and close documents so far.

I have discovered that Storyboards on MacOS don't quite seem ready for prime time. First, there's a bug that windows don't cascade when creating a new document. Second, the split of the original NSDocument class into NSViewController and NSPersistentDocument subclasses creates something of a conundrum. The NSPersistentDocument owns the Managed Object Context, but the NSViewController subclass is the place that owns all of the UI actions.

To make things worse, the main menus actions only appear to be able to effectively target the application delegate. If you want to target something in the NSViewController or NSDocument, you have to write a handler in the application delegate to find the current document view controller and call the right method.

I've figured out the proper way to do the menu actions, but I'm still puzzling out how to handle the managed object context from the view controller actions.

None of this is rocket science, but it's certainly slowed things down, as I have had to create separate projects in order to figure out the most appropriate way to do things.

I'm still learning Swift. The nuances of optionals and when to use the various operators is something that will come with practice. The compiler is keeping me on the straight and narrow.

Monday, December 26, 2016

The Radio 2017 Project

My long-time friend Chris, K4JCW, invented the term GUP. It's an acronym for Great, Unfinished Project. Naturally, any unfinished project can always be great. Because, well, it is unfinished. If it lacks greatness at the moment, there's always a chance it could be added. The greatness of any project reaches maximum before it starts.

A couple of months ago, I got to thinking about some of my unfinished software projects. I've already talked about my casual logging program. While I've made a few small enhancements over the years, it's basically the same program I wrote in 2006. There are others I've been meaning to write for the Mac for several years.

This summer, after the Apple World Wide Developers Conference (WWDC), I studied the updated Swift 3 language. It seemed to me that Swift was probably mature enough to start using. I also caught up on several videos, including those on how to use storyboards in MacOS applications, something that was certainly not possible ten years ago.

I decided it is time to develop some new Mac software. I've labeled this the Radio 2017 project, as I hope to be done within the year 2017. I have identified the need for the following applications:
  • Casual Logging Program - very basic logging program with import / export to ADIF, control of the Elecraft K2/K3, support for RTTY and PSK operating, as well as CW keying, automation via AppleEvents / Automator
  • Contest Logging Program - logging program with contests, supporting main ARRL, CQ and NA contests. Import / export to Cabrillo, ADIF. Support for CW keying and RTTY and PSK operating.
  • SDR Software to use with SoftRock Lite II - I purchased the SoftRock Lite II to use with the K3 IF frequency. This would serve as a pan adapter / spectrum analyzer.
  • Remote Control Server  and Client - to allow me to operate my Gwinnett station from anywhere.
  • QSL Tracking Software - track paper QSLs against awards.
All of these would be useful to me. There are probably a couple of utility applications to consider as well.

In writing this software, I've decided to stick to a few goals:

  • Swift 3 - the applications should be written almost entirely in Swift 3. (There are a few APIs -- notably Core Audio -- that are more appropriately accessed with Objective C/C++. I'll likely use Swift-callable wrapper classes for those)
  • Storyboards - the UI should be constructed using storyboards.
  • UI Guidelines - applications should follow the latest Mac UI guidelines.
  • Store-ready - should these applications turn out well, my stretch goal is to publish them on the Macintosh App store.
The hardest part of this sort of project is maintaining focus and motivation. I hope to help that by publishing my progress here each month. Wish me luck!

Thursday, November 24, 2016

Rethinking the Station Desk

Recently, the water supply line to my Gwinnett house had to be replaced, and that meant I had to clear out my station operating desk so the plumbers could work. With everything moved out from that end of the room, it was the perfect time to re-think the station desk.

Truth is, I had been thinking about this for the past year. Ever since I moved back from Floyd county, I had considered making some changes. Some of this was based on my experiences with the Micro-shack.

Let's start with the desk. In 1985, I bought a 30" solid-core door and placed it over a couple of two-drawer file cabinets. Over thirty years and two moves later, that's what I'm still using. The door has stood the test of time. I originally stained it and coated with polyurethane. When I moved to Gwinnett county eight years later, I sanded it down again and gave it a fresh coat of polyurethane. More than 20 years later, it was again time.

I also made one modification I should have done from the start. I took a router and a 1/4" radius bit and rounded off the top edge of the door. For years, the sharp edge of the door had been cutting into my arms as I rested them on the edge while contesting. The gentler radius prevents that entirely. With a fresh coat of polyurethane, it feels quite smooth.

The two-drawer file cabinets were cheap and provide ample support -- although one of them has to be pushed back pretty far to support the back end of the desk, and thus you can't really use the top drawer to store anything. But the biggest drawback is the height. The resulting tabletop is 30 and 1/4" above the floor -- just a little bit high. In contrast, the Micro-shack desk was closer to 29" above the floor. A much more comfortable height.

I've considered moving the filing cabinets out and replacing them with a 2x4 frame to support the weight of the desk to get a more optima height. I may still do that.

Back nearly thirty years ago, I built a shelving hutch that sits on the desk, holding the equipment on three levels. Made from 12x1 lumber, it's not quite as square as I'd like, but I wasn't much of a craftsman thirty years ago, either.

Back then, I purposely made a shelf about an inch off the desk, and that's where the equipment goes. The space underneath was intended to allow logbooks and other operating aides to be stored, out of the way. I haven't used paper logbooks in a decade now. I did just fine in Floyd County with radios right on the operating desk. If I did again, the shelving hutch would have the first compartments on the desk directly.

Another thing that has changed is space for a computer. Thirty years ago (and yes, I did have computers thirty years ago), the computer was off to the side, and 90 degrees to the operating desk. Today, I almost exclusively use laptop computers. Using a computer is integral to radio contesting, and a lot of my DX chasing. And one side effect of having bifocals is not to have the monitor too high off the desk -- otherwise I end up leaning my head back uncomfortably far.

Any new shelving hutch would have space front and center to slide in a 15-inch laptop or a keyboard and monitor. With room on the right (and left) for radios.

Certainly something to think about.


Tuesday, September 6, 2016

Fixing the Heil BM-10

Repaired Heil BM-10
Back in the early 1990s, I'd been contesting using a Kenwood MC-50 desktop microphone. It worked well enough. But long hours of contesting in one position became uncomfortable. So, I decided I need a headset with a boom mic.

Heil had recently come out with a lightweight headset, the Heil BM-10. For right at $100, I purchased one with the HC-4 element. The HC-4 was supposed to have a little bit more "punch", great for DX and contest work.

I was immediately pleased with how it performed. I used that headset for many years, many enjoyable contests. It was pretty comfortable, although after several hours, even the light touch on the  ears would cause a little irritation. The foam pads on the ears have been replaced a couple of times.

And then, in December of 2007, it quit. The microphone element stopped working. I disassembled it, determined that the element wasn't working, and it sat. I wanted to order a replacement HC-4 element. After all, Heil used to sell them. But no more.

After a while, I purchased a Heil Pro-set, perhaps one of the last ones made with the HC-4 element. It works spectacularly with the Elecraft K3.

So the BM-10 laid disassembled, for a suitable microphone element.

Electret microphone nestled in a bed
of foam.
This past January, I ordered an electret microphone element from Ramsey Electronics. It was probably one of the last kits they sold. The kit came with a resistor and coupling capacitor to isolate the bias. The capacitor was far too large to fit inside the 8-pin DIN connector, so used a smaller unit from the junk box.

I also replaced the boom mic clip. The original one had long ago cracked and was held together with a screw. Hell fortunately still sells them as a replacement part.

I had to do some hunting to find the microphone cover. The headset had been disassembled so long all the parts weren't in the same place.

Works like a champ. A bit of foam to keep the element from rattling around, and perhaps it is good for another dozen years or so.