Thursday, January 27, 2022

Forty Years of Personal Computing - MC6800 years - Cassette Tape and BASIC

Percom CIS-30+. Note that the handles of two
switches have broken off.
I don't have a lot of records about the early use of my  my first personal computer - the SWTPc 6800 Computer System. I purchased it in November of 1977, built initially with 8 KB of memory, shortly upgraded to 12 KB.

Around December 1977, I purchased the Percom CIS-30+ cassette tape interface. These interfaces allowed one to store and load programs on audio cassette tapes. 

The CIS-30+ had major advantage over the SWTPc AC-30 cassette tape interface. Like the AC-30, the CIS-30+ supported the 300 bps Kansas City standard, but it could also record and decode at 600 and 1200 bps. This allowed programs to be stored and loaded two to four times faster. 

Insides of the CIS-30+.
One early modification I made to the CIS-30+ was a small LED for the Tape On switch. This switch changed the serial input from the keyboard to the tape interface. More than once, I had left the switch in the on position and wondered why I couldn't type anything from the keyboard.

Originally, the CIS-30+ sat on top of the SWTPc 6800 Computer System. At some point, before I moved to Atlanta, I removed the board from the small aluminum case, and mounted it on the front panel of the SWTPc 6800 Computer System, in a space right above the power switches. This made the whole unit more compact, and reduced the number of cables that had to be dealt with. 

I've since removed the cassette interface, and the holes that remain in the computer font panel. 

The first program loaded was Rob Uterwick's Tiny Basic, which required 4 KB of memory. That was perfect for my machine, as it left 8 KB of space for programs.

Tiny Basic was distributed uniquely.  The May 1977 issue of Interface Age contained a thin plastic record with Tiny Basic in Kansas City standard format. I jigged up a circuit so I could play the record on my family stereo and record it on a cassette tape. It took several tries to get the levels right, so the recording was readable. The magazine also had a hex dump of the program, so I verified that everything loaded correctly.

Tiny Basic was fun, but very limited - no string variables or functions. In the spring of 1978, I purchased SWTPc's 8K BASIC and the 6800 Co-Res Assembler / Editor.
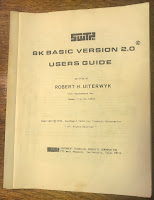
Rob Uterwyk's 8K
BASIC Manual.
With a full-featured BASIC interpreter, I amused myself by entering games. I had a copy of David Ahl's 101 BASIC Computer games. The dialect of BASIC was slightly different than that in the book, so minor changes had to be made. Still it was fun. I also entered programs that were published in magazines. Hunt the Wumpus was one of my favorites. As was Lunar Lander. 

6800 Co-Res Manual.
The Lunar Lander game was amusing. It prompted you for an amount of fuel to burn at each step, as you headed toward the moon. One time I let the lander get really close, then entered 1.0E+99 -- the largest possible number -- as the amount to burn. The result must have caused some kind of weird numerical overflow, since the next step had the lander successfully on the surface!

One of the magazines published a Fantasy Adventure text game in BASIC, and I managed to get it running on my computer. At school we had a "Fantasy and Renaissance Fair", and my computer was featured running this game as one of the exhibits. 

Setting up the computer to run this game was an involved process. First, you had to load the BASIC interpreter. The first part of the 8K BASIC tape had a binary loader program (which was twice as fast as the Motorola S1 format). With that program loaded and executed, you would load BASIC. The second step, after BASIC was running, one loaded the game from a different cassette tape. Then one could execute the game. All of this was done at 1200 bps speed, and the process took nearly 30 minutes. 

Someone managed to kick the power button on the computer in the middle of playing, turning it off. I spent the next 30 minutes of the festival re-starting the game....


Sunday, January 16, 2022

The Desktop Shelves

Updated shelves as of January 2022. The AL-80A
Amplifier is just off to the right side, on the desk.
Setting up my shack in my first home, in 1986, I needed to stack equipment. My operating position was a finished door on top of two filing cabinets, something that I used in my previous apartment. While the table was big enough, shelves were needed to easily access all my equipment. 

I came up with a design using 1x12 lumber. There are three shelves, one 1", 12" and 22" above the tabletop. I chose these heights because it allowed me to slip my paper log books and other operating aids under the bottom shelf -- under the bottom row of gear. 

I bought a stack of 1x12 boards, borrowed a friend's table saw and cut the pieces to length. I laid them on edge on the cement floor of my garage, glued the edges and pieced them together with wire brads. Everything lined up OK -- the result was pretty square.

35+ year old shelving unit, before
it was removed from desk
The shelves were 48" wide ( 8 foot boards cut in half ), and had two uprights under each shelf. These shelves worked for several decades.

Over time, I noted problems. The upright supports limited the equipment I could put side by side, because only so much would fit. And the lowest shelf was problematic -- it meant my computer was in front of the shelf -- which meant my arms hung off the desk, with my forearms resting against the edge of the desk. This caused a lot of fatigue when contesting. Plus, I had stopped using paper logs back in 2006, so there was no reason for the lower shelf.

Micro-shack, before I moved.
I liked the layout I had back in the micro-shack. The desk surface was small (just a couple of inches wider than 5 feet), and the primary equipment sat on the desk itself, with other gear on a shelf. This meant I could re-position my gear at will. Best of all, the computer could be front and center, with my forearms resting comfortably on the desk itself. 

After 35 years, the requirements came together. I needed a shelf unit with two shelves. The first shelf would be 12" above the desk, and the second shelf 22" above the desk. This left more than enough room to slide a 15-17" laptop under the bottom shelf. The shelves could be a little wider, to accommodate more equipment. Because my copper pipe grounding bar was a little more than 53" long, I opted to make the unit 52" wide. 

I liked having the AL-80A amplifier on the right side of the desk, canted slightly to make the controls accessible, and allow for good cooling airflow. With a 52" wide self unit, this meant about 8" of unused desk space on the left-hand side. That was fine. That part of the desk is right next to a wall, and I don't put equipment that deep -- usually that's where my headphones and operating aides end up.

The bottom and top shelves would be separated by two uprights, with openings of roughly 17" on the left and right, and 15" in the middle. Under the bottom shelf, there would be no uprights. Instead, to keep the shelves from bowing, I used a piece of 1x4 as a sheer web at the back of the unit. 

Here are the component dimensions used:

  •   top (1x12) - 52” 
  •   shelf (1x12)  - 50 1/2” 
  •   ends (1x12) - 21 3/4” (2) 
  •   separator (1x12) - 10” (2) 
  •   shear web (1x4)  50 1/2” 
I bought the requisite 1x12 and 1x4 lumber, but didn't cut or assemble until later. This was unfortunate, because the lumber cupped a little bit as it dried out in my basement. This made the pieces a little harder to fit together. I used the same construction technique I used before -- glue and wire brads. 

And even though I put the pieces together on my very flat workbench, a little bit of twist was introduced in the bottom shelf. It doesn't quite line up in the front like it should -- something I'll be looking at for the next 30+ years. I considered busting it apart and starting over, but I decided it would do as is. 

Assembled unit with
grounding bar installed
I intended to stain it and seal with polyurethane. However, I found that my stain had turned into a solid mass of jelly and was unusable. Instead, I applied three coats of polyurethane. The resulting finish is quite handsome.

The shelf unit is relatively light and quite sturdy. I'm sure it would support my weight, but I didn't try. The copper pipe grounding bar fastens to the 1x4. I use small hose clamps to attach wires to the grounding bar. This ensures that all gear is properly bonded to ground.

I'm very satisfied with the end result - plenty of room for gear on the desktop, with other gear on shelves at a handy height. The bits and pieces of equipment are slowly coming back to the operating desk, and I'm being careful in deciding what goes where -- it can get awfully cluttered. 

I do love having a lot of space for computer gear on the desktop. I've had as many as three different laptops all running at the same time on the desk.

Now I've got to finalize where everything goes. I've already decided I need to move the P3, and the KK1L antenna switch matrix is going to end up on the basement wall on the Single-Point Ground panel.