Monday, January 30, 2023

Forty Years of Personal Computing - BBUG

BBUG and OS-9 EPROMs

In the early 1980s, I was excited about the MC6809 processor. I wanted one. But my student budget couldn't afford it. I studied all material about the MC6809 I could get my hands on.

In 1981, I obtained the source code to SBUG-E, the SWTPc ROM monitor for the MP-09 board. I was familiar with the source code to the MC6800 ROM monitors MIKBUG and SWTBUG. SBUG-E demonstrated the elegance of the MC6809 processor.

As I understood SBUG-E, I wasn't satisfied with it. I began to modify the source to suit my own purpose.  I called this resulting monitor BBUG. 

I worked on BBUG for a couple of years, off and on. My earliest printout is from April 1981. I wrote code using a cross-assembler and pour over the listings. I hunted for ways to make BBUG compact, as it had to fit in a 2 KB ROM. But the code never ran until I built the Homebrew MC6809 CPU board in mid-1983. (Which is another story)

BBUG's command structure is similar to SBUG-E, as is a lot of the code. Here are the differences.

Commands Removed

I removed several commands from SBUG-E. My plan for an MC6809 computer had floppy disks, so the cassette tape operations were the first to go. The DMAF1/2 8" disk system seemed incredibly expensive, so I removed that boot command, and used the D command character for an SS-30 floppy disk controller boot. Finally, the stack memory dump didn't seem useful to me, so I pulled it, too.

In summary:

  • D - no DMAF1/DMAF2 boot - no DMAFx 8" disk controller
  • L - no cassette tape operation
  • P - no cassette tape operation 
  • S - stack memory dump didn't seem useful
  • U - changed this command to D, see below

Commands Added

I added a couple of new commands for BBUG. The first was a memory fill command. SWTBUG had this as well. I also added a help command.
  • F start-end byte - Fill Memory from start to end address with given byte value
  • Z - Help - prints a summary of commands

Other Changes / Refactorings

Other parts of SBUG-E were re-written and improved:
  • Q - I spent some time in college investigating memory test methods. I re-wrote this test to use a modulo 255 memory convergence test with nine total passes. This is a fast test that detects most kinds of memory errors.
  • U - Changed this command to D and completely re-wrote as an improved boot from an SS-30 Floppy Disk Controller. Major changes include:
    • Performs up to sixteen tries, allowing recovery from soft errors.
    • Alternates single and double density between tries, so it can boot from double-density disks.
    • Works with FD1771 and WD2797 controller chips
    • Works with 5 1/4" and 8" versions of controller board (more on this later)
  • Command code positioned in alphabetical order in source. This made no difference in the space requirements or efficiency of the monitor, but it made it much easier to find the commands I was working on.
  • Alter register commands refactored to use less space.
The last iteration of BBUG v1.91 fits in a 2 KB EPROM with 1 byte to spare. 

4 KB Version

In October 1986, I experimented with expanding BBUG to fit a 4 KB ROM. This version has a test string at address F000, and the rest of BBUG at address F800. You can see this version at the bottom left in the picture above. 

The test was successful, and this left space for more commands. At that point, however, I was more interested in OS-9, and had less use for BBUG.

Future Changes

If I make any future modifications to BBUG, the first thing I'd do is a fix a bug. The extended memory initialization assumes that the E-block is at physical address FE000, so it writes F1 into that block. That's not compatible with the current Homebrew MC6809 V2 board (which is another story), where the value should be 01 instead. This would also match the value written by OS-9 Level 1. 

There's also 2 KB of additional space for more commands. Extended memory functions would be welcome. A command to catalog all the extended memory blocks would be useful, as well as running memory tests on extended memory blocks. That would be a start. And I might bring back the stack memory dump command.

Monday, December 26, 2022

Forty Years of Personal Computing - Code Practice Program

In the spring of 1980, as my first year at Georgia Tech was coming to a close, my parents were coming to pick me up and take me home to West Virginia in June. My brother Ben suggested during the trip, we could take the FCC exams for Amateur Extra class. At the time, we were both General class, and all exams were administered at official FCC offices, such as Atlanta.

I wondered how I might practice for these exams. Although I was a member of the Georgia Tech club station W4AQL, getting access was a hassle. I hadn't been on the air since I'd come back to Tech in January. I was afraid I had forgotten Morse code entirely. My solution was to write a code practice program for my SWTPc 6800 Computer System, using the Kreepie Peepie. 

The program is small, just over 200 bytes long. It creates a five character code group by choosing characters randomly. Then it sends the group, complete with a word space. A check of the serial port determines if someone has input a character, indicating a request to stop. If not, it continues to generate and send the next five character group.

The characters themselves are sounded out by toggling a bit on the Kreepie Peepie. A wait loop of roughly a millisecond is used. This gave a pitch of about 1 kHz. The wait cycles are repeated a sufficient number of times to sound out the element (BAUDV). Silent periods used the same timing element, without toggling the Kreepie Peepie. This made it easy to adjust speed by changing the BAUDV location. I had this programmed to 64, which came out right about 20 wpm.

I'd typically run the program for a few minutes, copying as many of the five character groups as I could. It was enough. I passed the FCC 20 wpm exam.

Thursday, December 8, 2022

Upgrading the KK1L Antenna Switch Load Resistors

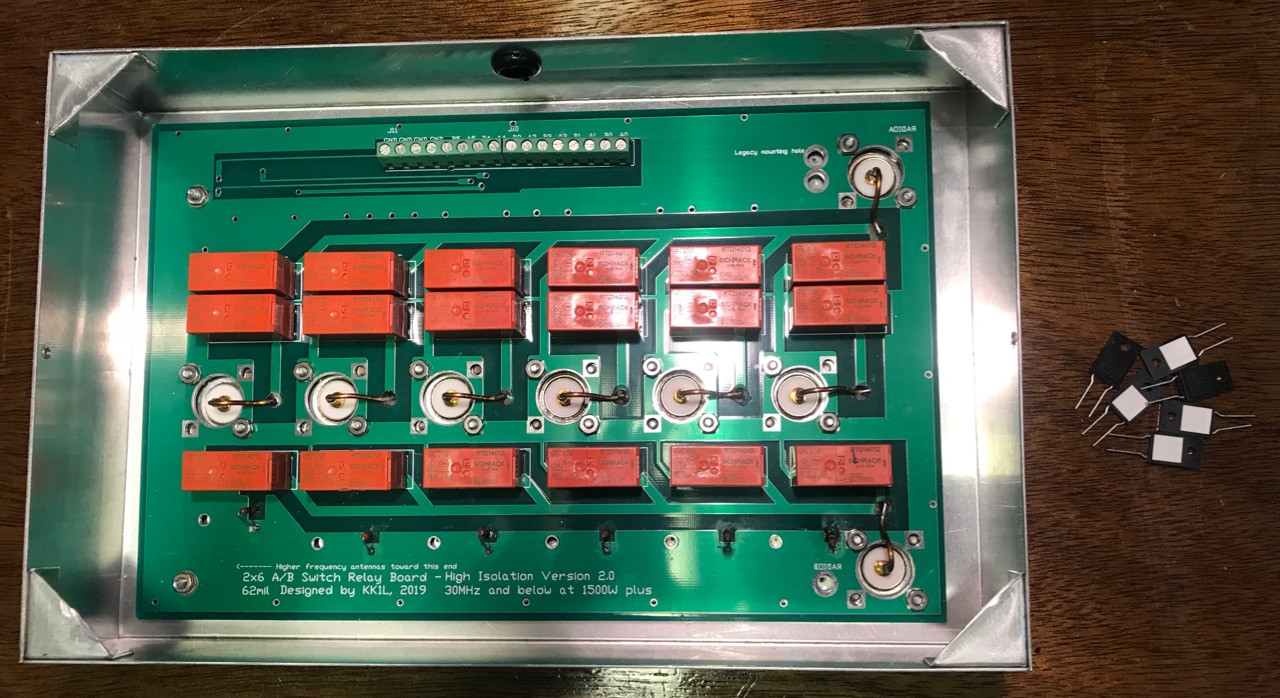
My KK1L board, showing the old resistors on the
board, and the new ones on the desk.
While testing the KK1L Antenna Switch after mounting to the Single Point Ground (SPG), I noticed that some of the load resistors were no longer 50 ohms.

These resistors provide a load impedance whenever a antenna jack is not selected by either port A or Port B.  This protects the antenna from static build-up as well as dissipating any coupled RF energy.

I originally used 50 ohm, 1/2 watt resistors I had on hand. Clearly they were not up to the task. On the ports for the shunt-fed tower, and the 80/40/20m trap dipole, these resistors were completely open. Both showed signs of overheating. 

Most likely, these resistors succumbed to dissipating too much couple RF energy. I needed bigger ones. KK1L had 50 ohm, 50 watt resistors in his Mouser parts list, so that's what I ordered. These sorts of things come in handy, so I bought ten. Due to supply chain issues, they were back-ordered for months. But they finally arrived.

Replacing these parts is a pain. First, I had to remove the KK1L box from the SPG panel. Next, I had to remove the board from the aluminum box. Before I did that, I made sure to mark the locations the mounting screws for each resistor. To remove the board, I had to unsolder the eight connections to the SO-239 center conductors and bend them out of the way. Then came twenty-some nuts holding the board in place. 

With the board separated from the box, I drilled the holes for the resistor mounting screws. I used a numbered drill bit the same size as the hole in the board to give me the largest tolerance. With the holes drilled and de-burred, my attention turned to the board.

Board with new resistors
Next step was to remove the existing resistors. Where they connect to the relays was easy, but the connections to the ground plane were harder. The ground plane tended to carry the heat away, making it hard to melt the solder without damaging the board. Getting these holes cleared of solder took a lot of effort. 

Once done, the new resistors mount cleanly on the underside of the board. I oriented the resistors so the ceramic patch was toward the aluminum box. This patch does not appear electrically conductive. 

After the resistors are soldered, the process is reversed to re-install the board in the aluminum box. In addition to the existing twenty-some nuts, there are also six new #4 screws and nuts to mount the resistors securely. With that in place, re-soldering the eight connections to the SO-239 center conductors completes the job. 

I mounted the KK1L box to the SPG, and then re-tested all the switching combinations. This was to ensure I had connected the switching lines correctly.

I hope the new resistors are up to the job. I'll have to check on them in a few months to make sure. 

Wednesday, November 30, 2022

Forty Years of Personal Computing - Modems and Serial Ports

The GE TDM-114 Data Set. The big toggle
switch is my modification so I could turn it off.
GE TDM-114 Data Set

In the fall of 1979, I headed off to Georgia Tech and brought my computer with me to the dorms. My roommate that first quarter wasn't impressed. Nevertheless, I continued to work with the computer and learn new things.

In those days, Georgia Tech used a CDC Cyber 74 system for instruction, and one could dial into the system with a modem. I managed to locate a GE surplus modem for about $40. It was an acoustic coupler modem -- you would dial the phone manually, then jam the handset into the unit. Speakers and microphones would pick up the sounds from the phone line through the handset.

Rear View of TDM-114.
In my second quarter, I ordered a unit. When I got it, it did not work.  Fortunately, it came with a manual with a schematic and troubleshooting and adjustment guide. I didn't have any test equipment other than  a Volt-Ohm Meter (VOM). I don't remember how I fixed it. With youthful curiosity and dogged persistence, I managed to find a diode that didn't appear to be working, replaced it, et voila! It worked. 

Manual with unit.
This was a BELL 103 modem, which meant it supported speeds from 110-300 bps. Back in 1980, that wasn't as slow as it seems. Who am I kidding? It was really slow. It was what we had.

Schematic
Initially, I hooked the modem directly to my CT-64 Terminal system. It was fun being able to dial the Cyber 74 and work on programs from my dorm room. But, it was a pain to swap the cables around between the computer and the modem. It would be nice to leave the CT-64 plugged into the computer all the time, and plug the modem into another serial port. I needed more serial ports.

MP-S

I purchased two MP-S serial ports in early 1980. These boards use the MC6850 Asynchronous Serial Adapter (ACIA). The advantage of the ACIA is it could transmit and receive individual characters without any CPU attention. The big-banging serial port used by the MP-C required the CPU to actively perform all sending and receiving.

The MP-S is really simple, especially after removing the current-loop circuitry, as I've done.  I liked this about the design of the SWTPc 6800 Computer Sytem - I/O devices could be added very inexpensively. 

One board replaced the MP-C (since I was using SWTBUG by then) and communicated with the CT-64 at 1200 bps. The other used a different slot and was wired for 300 bps. Making them talk to each other was a small matter of software.

The Terminal Program

My initial attempt was a mad polling program in 6800 assembly language. It consisted of a crazy loop that looked for received characters from one port and transmitted them on another, and then did the same thing going the other direction. It even had buffering in each direction.  It probably wasn't even 100 bytes long. It worked well.

In the fall of 1980, it occurred to me this could be an interrupt-driven program. This took a bit of doing. You had to configure the proper interrupts and then have an interrupt service routine to determine the cause of the interrupt and service it. Get something wrong, and nothing would happen. This made it much more difficult to debug. 

I rose to the challenge and got it to run. I included even larger buffering than in the first program. I had hoped to use the MC6800's WAI (Wait for Interrupt) instruction, but ended up using the idle time to perform buffer housekeeping. 

The buffering came in handy. For a while, I had a switch on the CT-64 that would pause reception from the computer. I could run a long listing at 300 bps, flip the switch and read a screenful while the next screen slowly buffered in my computer. flipping the switch again and it would spool on the screen at 1200 bps -- the top speed of the CT-64.

This experience laid the groundwork for my first job -- at Hayes Microcomputer Products, Inc after I graduated from Georgia Tech. I spent nearly twelve years writing much more sophisticated terminal programs. 

Sunday, October 30, 2022

Forty Years of Personal Computing - The ISEF (1979)

Yours truly, at the 1979 ISEF, with my exhibit.
I've written about my attempt to write a BASIC interpreter. While I never finished the project, it did win a few awards at science fairs.

Area Fair  - Fairmont State College - March 30-31, 1979

While writing the interpreter, my parents thought my efforts would make a good science fair project. I entered the West Virginia Area Fair. My father, being a professor there, was a judge. To avoid any conflict of interest, he did not judge my category.

My interpreter was by no means "done". I was still working on it. I put together an exhibit discussing the various things I did to improve computer performance, including fixing the CPU clock source.

I did well at the Area Fair, winning the US Air Force Honors award for the most outstanding exhibit in my category. I also placed first or second overall. This was a matter of debate. The first place winner would travel to the International Science and Engineering Fair (ISEF). This trip  was sponsored, in part, by a consortium of coal mining operations. The other exhibitor I tied with had built an impressive and detailed model of a modern coal mining operation. The coal miners wanted to send him. After all, his exhibit said "COAL!"

The professors of science weren't that impressed with the model, and they wanted to send me. (My father, of course, declined to vote) They worked out a compromise. They would see how we did at the Regional Fair, and break the tie that way.

Regional Fair - West Virginia Wesleyan College - April 20-22, 1979

West Virginia Wesleyan College impressed a kid from a small town like Fairmont. I toured their computer science lab, using a PDP-11. I met some of the students and got to talk to professors of computer science. One of them (sadly, I cannot remember his name) gave me some helpful suggestions on how to solve certain parsing problems, as well as methods to compute mathematical functions I needed. 

I was impressed with the lab, the professors and the other talks that I scarcely remember my presentation. My mother remembered me holding up the October 1977 issue of Kilobaud magazine like everyone must have read it. 

It must have gone well. My exhibit won two awards, an outstanding exhibit award in my category for large schools, plus a US Army / Science Service certificate for outstanding achievement in my category. I also placed 3rd in the state overall. My competition from the Area Fair? He didn't do so well, and didn't even place in his category. That meant I was first place in the Area Fair, and would be going to the ISEF.

Trying to Finish

I was desperate to finish my work before the ISEF in San Antonio. It was my Senior year of High School, and there was a lot going on. I had less than two weeks to prepare.

I read the rules of the ISEF competition. The venue required all equipment have 3-wire electrical plugs. I replaced the cords on the terminal and computer to 3-wire cords and plugs -- the only ones I could find at the local hardware store were bright orange and very heavy. The tape recorder had a two wire plug, but I could run it on batteries if anyone complained. 

That job done, I turned to the interpreter. I've already described that during one of the late work sessions I over-wrote dozens of hours of work. There was no way to replace this work in the time remaining. I would go to the ISEF with an incomplete project.

The Trip

The time came to ship my equipment to San Antonio. There would be no further work done. 

Shipping my computer worried me. There were so many things that might fail in transit, I wanted to be able to repair them. The airline allowed a small personal bag. I filled it with virtually every tool I owned. A soldering iron, multi-meter, screwdrivers, wrenches, solder, parts. In all about 35 pounds of tools in a small gym bag. 

Today, you couldn't walk through airport security with 35 pounds of tools, they would never let you board. In 1979, they asked me what all of it was for. I explained that I needed them to fix my equipment that had been shipped to San Antonio. This seemed satisfactory, and they let me board.

International Science and Engineering Fair - San Antonio, TX - May 7-11, 1979

At the Fair, I worried about setting up my exhibit. Fortunately, everything survived the trip, and was set up in short order. It all worked. I noted the exhibitor next to me had a Radio Shack TRS-80 computer -- all with two-prong AC plugs....

If you study the picture, you can see that I brought everything -- CT-64, SWTPc 6800 computer system, CIS-30+, cassette recorder, tapes and even the Kreepie Peepie. I also had hand-outs, a paper and the source code sitting on the table. (And, yes, I could not spell "binary" correctly)

Without an interpreter to show, I wrote a simple program that drew a sine wave vertically on the terminal using asterisk characters and spaces. This was a good demonstration of how slow SWTPc 8K BASIC was. I left this program running each time I left the exhibit. When I returned, the program had crashed. I never figured out why.

I don't remember my presentation to the judges, so it must have gone OK. I didn't place in my category. I was just happy to be there at all, especially with an unfinished project.

The ISEF arranged some tours for the exhibitors. One was to a solar power farm at the University of Texas. Another was a trip to the USAA offices, touring their computer center. They had all IBM equipment, including a large mainframe and one of the new laser printers with a 77" imaging drum. It was my introduction to a corporate computing environment. 

I remember one of the docents talking about who they hire at USAA. It wasn't all computer science majors. In fact, some of their best programmers were actually music majors. 

And there was a welcoming event for the exhibiters. I was super shy back then, so I don't remember meeting anyone. But I do remember the food. It was my first experience with tamales. They were much easier to eat once you removed the corn husks....

Friday, October 21, 2022

The Single-Point Ground (SPG)

SPG all hooked up to coax
and control lines.
As radio amateurs, taking proper precautions against lightning and electrical surges can be a difficult and expensive proposition. We often neglect them and rely on luck.

After reading Bonding and Grounding for the Radio Amateur,  I decided it was worth the investment. I already had all ground connections - house, tower, station - bonded. What was missing was bonding the antenna connections to the ground as they entered the house. I needed a Single-Point Ground panel.

A Single-Point Ground is a metal panel or box providing a common bonding point for all cables as they enter a building. This metal is connected to the external ground rods, which are all bonded together. The idea is to bond the cables connected together, so that lightning or surge potentials all rise and fall together. Without a potential difference, damaging currents cannot flow. 

SPG panel ready to mount
on basement wall
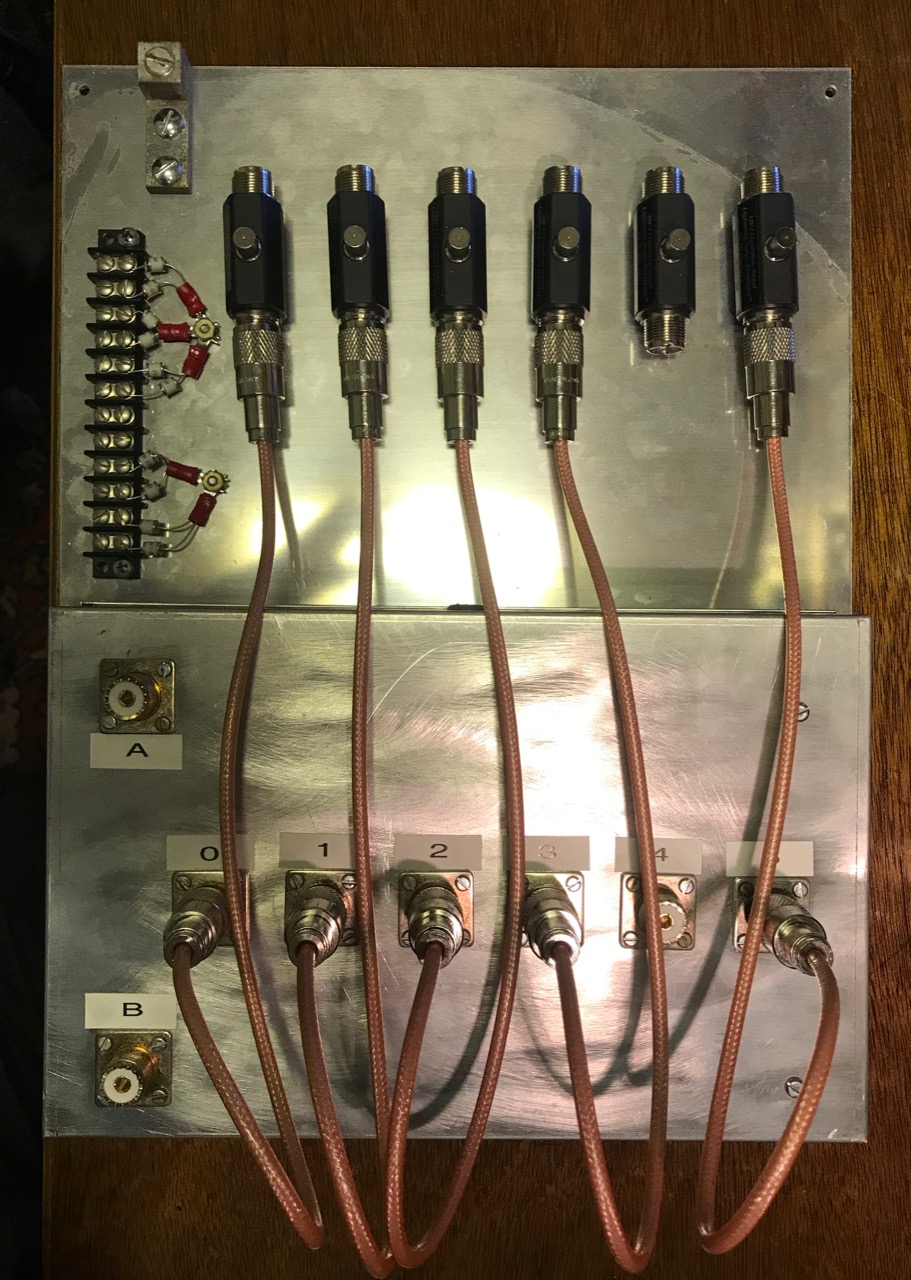
I cut a 0.090" Aluminum panel 12" by 16" and mounted the KK1L antenna switch to the bottom edge. I added lightning arrestors for the antenna coaxial cables, plus a barrier strip holding gas discharge tubes for the rotator and shunt antenna control cables.

I chose MFJ-272 lightning arrestors. I needed six of these, and the MFJ units were about $40 each. The Alpha Delta and Polyphaser units were more expensive. The arrestors are mounted to the panel with a single large screw, supplied with the arrestor.

Short coaxial jumpers connect the arresters to the KK1L switch. I made these out of 18 inches of RG-400 coax using new Amphenol UHF connectors and a UG-175 adapter. RG-400 is doubly-shielded, eliminating the potential for any coupling between the jumpers. (Notice I didn't quite have enough RG-400 for all six jumpers, so there are only five at the moment. I'll have to purchase more)

The panel mounts on the basement wall where the cables enter the house through a 4 inch PVC pipe. A grounding block connects a short piece of copper wire to an eight foot ground rod on the outside. The ground connection is also bonded to the perimeter ground wire between the house, tower and station grounds using a split bolt. 

I had a bit of trouble with the coax running from the A and B ports of the KK1L to the operating desk. Since the coax to the antennas ended at the basement wall, I trimmed some coax from the antenna feed lines. To get the right length, I pulled the feed lines outside, then trimmed them from the far end. Simple, eh? Except the first one looped around and got stuck, and the cut piece ended up being about five feet too short.

The next feed line was a newer run of Davis Buryflex. I ran it to the A3S/A743, and then cut the right length. For some reason, I had problems with the connectors on both ends, but once they were redone, the cable worked as expected. For a short while, I thought the cable itself might be defective.

To do these tests, I made good use of my RigExpert AA-55 Zoom. Which of two pieces of old coax is any good? The cable loss test is quick and give one real numbers to compare. You just need to test the coax both open and shorted. 

With the SPG installed, the next step is to automate the switching of the KK1L.

Friday, September 30, 2022

Forty Years of Personal Computing - "Compilative" BASIC Interpreter

Notebook containing the BASIC
interpreter source code
In June of 1977, Kilobaud (later Kilobaud Microcomputing and still later Microcomputing) magazine published an article by Tom Rugg and Phil Feldman entitled "BASIC Timing Comparisons"(page 66). A few months later, they revised this article in the October 1977 issue, with a follow up "BASIC Timing Comparisons - Revised and Updated" (page 20).

In the late 1970s, there weren't many computer languages available for small computer use. One either wrote BASIC or assembly language programs. Microsoft got their start this way --  selling BASIC interpreters to a variety of small computer manufacturers.

Assembly language is difficult. Having a high-level language, even one as, well, basic as BASIC made programming more accessible. I used Robert Uterwyk's 8K BASIC interpreter, sold as SWTPc 8K BASIC. When the Kilobaud articles came out, I was shocked to find the SWTPc 6800 Computer system ranked near the very bottom.

No way! The Motorola MC6800 was capable a spot near the top of the list, once you adjusted for relative clock speed -- a 2 MHz Z-80 or 8080 is equivalent to a 1 MHz 6800 or 6502. Something wasn't right. The problem wasn't the machine, it was the software.

The Problem(s)

My experience with SWTPc 8K BASIC showed there were three issues. First, it did no syntax checking on entry. This told me statements weren't parsed until the program was run. Second, each line had to be re-parsed during execution, which slowed things down further. The third wasn't really a bug. All the other BASIC interpreters used 32-bit floating point numbers for their calculations. SWTPc 8K BASIC floating point numbers used Binary Code Decimal (BCD), and supported nine-digits of precision and exponents of plus or minus 99. These numbers took six bytes to store, and many more instructions to calculate, but covered a larger numeric range and precision.

Math Routines

I decided I would write a BASIC interpreter. I started with math routines. My floating point format was straightforward. One byte was the exponent, and the next four bytes were the mantissa. Both were two's complement binary numbers. I worked on these routines hard, and manage to test them to the point I believed they were complete. 

The math routines used a sixteen level expression stack, all in page zero. The bottom of the stack held the X and Y registers -- where all math operations took place. This meant the basic math operations where coded directly on X and Y using zero-page addressing modes -- which was very fast. In retrospect, this meant a lot of shuffling values around in memory. Given the MC6800's lack of registers, perhaps this was a reasonable choice. 

Science Fair Project

At some point, this became a science fair project that got me to the International Science and Engineering Fair (ISEF) in San Antonio, TX. I'll tell that side of the story in a separate article.

The Interpreter

Flowchart of edit / command
mode
With the math routines in place, I focused on the editor/interpreter. 

My editor parsed input on entry, storing keywords with one-byte tokens, where the high bit was set. This took less memory to store, plus it was faster to interpret. For this reason, I dubbed it a "compilative" interpreter -- due to the pre-parsed statements in memory.

I had decided my BASIC would replace SWTPc BASIC. It would support the same statements, functions and language. From the start, I allotted for every statement, function, and expression.

I continued to work on the interpreter in the spring, even as I was showing my exhibit at various science fairs. I was nowhere near done. 

My style of working in those days was simple. I hand-wrote assembly language in notebooks, later typing it into the computer to build. Then I would write out the source and object to cassette tape. My terminal had only 16 lines, so hard copy in a notebook was easier to study. It also allowed me to write code when I wasn't at my computer -- like when I was at school. 

The project grew a lot, and the source exceeded the capacity of my small system. There was more code than would fit in my 20 KB system with the co-resident assembler/editor loaded. I worked on it in sections.

As things moved faster, my coding sessions got longer and longer into the evening. Then, one evening, I screwed up. I had just finished a programming session, and went to write the source out to cassette tape. But I had the wrong tape in the cassette recorder. I over-write dozens of hours of work. I didn't have time to re-do this work, and ended up going to the ISEF with an incomplete project. 

My code had run into a problem in any case. I made clever use of tables to deal with different aspects of parsing. I used three different tables for different situations. The tables had grown to the point where the code exceeded 8 KB. By the time of my late-night coding accident, I had decided to consolidate the three parsing tables into one large one, which should have solved some of the memory problems.

Looking Back

"Compilative" Interpreter 
After the ISEF, I never took up the project again. I was dismayed at losing work, plus I was busy that summer -- a trip to Spain, and getting ready for college. 

Writing a BASIC interpreter was a huge project. After forty years as a software development professional, it's clear I'd gone about this all wrong. My strategy was to build all the components of a full-fledged BASIC -- math routines, transcendental functions, editor, parser, execution, variable handling, and then stick them all together into a working program. I had a lot of pieces, but very little of it was actually working.

In retrospect, I should have started small -- focus on a simple subset of BASIC and gotten that working. Then incrementally add features to it. This would result in a working solution sooner. Plus, I would have had something to exhibit. I'd learn this later, with experience.

In this alternate path, at some point there would have been enough of an interpreter to run the Kilobaud timing programs. Once I could measure what performance was like, I would know if my solutions would work, or if it needed something more clever. 

Even so, I'm impressed with how much I wrote. Looking back at the two hundred notebook pages of assembly code and notes I've kept, there's much I'd forgotten I'd written. 

Epilogue

I wasn't the only one to react to those Kilobaud articles. Technical Systems Consultants (TSC) read them as well. TSC had a Micro BASIC Plus product in 1976 - a BASIC that fit in 3 KB. It supported integer arithmetic only, and no string operations. 

TSC developed a full-featured 8 KB BASIC for the MC6800. When they delivered it in March/April of 1979, it outperformed everything else on the market -- including Microsoft BASIC. 

This was about the same time as my late-night programming sessions. Had I only known.